Top 10 Tips to Replace Damaged WPC Panel Effectively
When it comes to maintaining outdoor spaces, the durability of WPC (Wood Plastic Composite) panels plays a crucial role. Reports indicate that WPC products generally have a lifespan of 10 to 25 years, depending on usage and environmental factors. However, damage can occur, leading to the need to Replace Damaged Wpc Panels. Understanding how to effectively manage this replacement is essential for longevity and aesthetics.
The process of replacing damaged WPC panels is vital, especially given that improper handling can lead to future issues. Research shows that nearly 30% of users encounter challenges during installation. This highlights the need for expert guidance. Utilizing the right tools and techniques can save money and time. Moreover, ensuring that new panels match the existing aesthetically is important for overall design cohesion.
Furthermore, reflecting on past mistakes can provide insights into better decision-making. Many homeowners fail to evaluate the root cause of damage, which can lead to recurring issues. Recognizing common pitfalls, such as neglecting high-traffic areas, can help prevent future repairs. By focusing on these areas, you can ensure a robust and visually appealing outdoor environment.
Understanding WPC Panels and Their Common Issues
WPC panels, made from wood and plastic composites, have gained popularity in construction. They offer durability and resistance to moisture, making them ideal for outdoor use. However, like any material, they are not without issues. Common problems include warping, discoloration, and damage from extreme weather. Understanding these issues can help in maintenance and replacement processes.
Identifying the signs of damage early is crucial. Cracks or faded colors signal that it's time for a replacement. Inspect your panels regularly for any signs of wear. Sometimes, a small repair could save the entire structure. However, ignoring minor damages can lead to bigger problems later. Remember, some issues might not be visible at first glance.
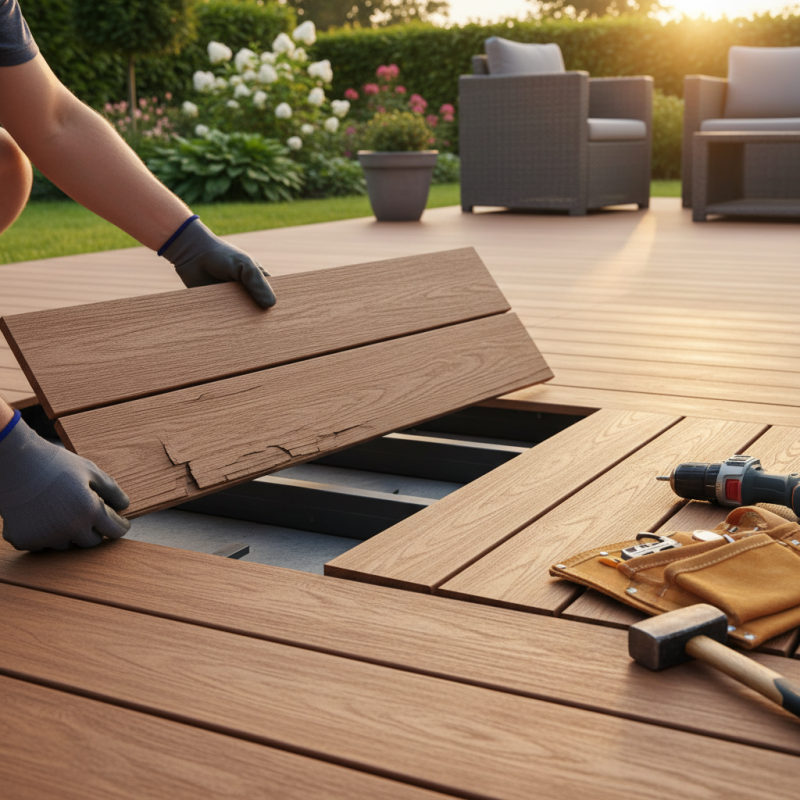
When replacing damaged panels, ensure you use the right tools. A saw and a sturdy adhesive are essential for efficient installation. It’s easy to make mistakes if you rush the process. Take your time to measure correctly and position panels neatly. Paying attention to detail improves the overall finish. A uniform appearance enhances the aesthetic value of your project.
Assessing the Damage: How to Determine Replacement Needs
Assessing the damage to your WPC panels is crucial for effective replacement. The first step is to visually inspect the panels for signs of warping, discoloration, or cracking. According to industry reports, approximately 30% of WPC panel issues arise due to environmental factors like moisture and UV exposure. Take note of these conditions to determine the extent of the damage.
Next, use a simple probe to check for structural integrity. If the panel feels soft or crumbles, a replacement is necessary. A study found that panels showing significant wear could reduce overall aesthetic and functional performance by as much as 40%. Keep in mind that some damage may not be immediately visible, affecting long-term durability.
Also, assess neighboring panels. Damage can spread if not addressed promptly. A proactive approach often saves time and cost. Evaluate the installation conditions as well. High humidity or inadequate drainage can contribute to recurring issues. Regular assessments help identify recurring patterns that need addressing. They can save you from future headaches and ensure a longer lifespan for your panels.
Top 10 Tips to Replace Damaged WPC Panel Effectively - Assessing the Damage: How to Determine Replacement Needs
| Tip Number | Assessment Method | Damage Indicators | Replacement Strategy |
| 1 | Visual Inspection | Cracks and Splits | Replace affected panels |
| 2 | Tapping Test | Hollow Sound | Remove and replace |
| 3 | Moisture Testing | Warping or Bubbling | Consider moisture resistance options |
| 4 | Checking for Insects | Visible Insect Damage | Replace infested panels |
| 5 | Checking Panel Alignment | Misalignment | Realign or replace |
| 6 | Checking for Surface Damage | Surface Scratches or Fading | Resurface or replace |
| 7 | Checking Structural Integrity | Loosening or Breakage | Replace the entire panel |
| 8 | Reviewing Installation Instructions | Improper Installation Signs | Reinstall according to instructions |
| 9 | Conducting a Cost Analysis | High Repair Costs | Replace if more economical |
| 10 | Gathering Expert Opinions | Uncertain Damage Assessment | Consult a professional |
Choosing the Right Replacement Panels for Your Project
Choosing the right replacement panels for your project is crucial. WPC panels, known for their durability, can vary significantly in quality and appearance. When replacing damaged panels, consider factors such as color, texture, and size. Ensure the new panels match your existing ones for a seamless look.
One tip is to review the specifications of your current panels. Knowing the thickness and dimensions helps in finding a precise match. When selecting new panels, investigate the material quality. Not all WPC is created equal; some may warp or fade over time.
Another important point involves installation. Improperly installed panels can lead to premature damage. If needed, consult with professionals who understand WPC materials well. They can provide vital insights and save time in the long run. Remember, even minor mistakes in selection or installation can impact the overall aesthetic and function of your project. Reflecting on these elements can lead to a more successful outcome.
Step-by-Step Guide to Removing Damaged WPC Panels
Removing damaged WPC (Wood Plastic Composite) panels can be a challenging but necessary process. Start by gathering essential tools like a pry bar, utility knife, and safety gloves. Safety is crucial; always wear protective gear. Begin by cutting around the edges of the damaged panel with the utility knife. Take your time to avoid unnecessary damage to surrounding panels.
Once the cuts are made, use the pry bar to gently lift the panel. Be mindful of any fasteners that may be hidden underneath. This step can be tricky, as old panels may have rugged edges or stubborn screws. If you encounter resistance, reassess your cuts and ensure all fasteners are removed. Persistence is key; don’t rush this part.
After successfully removing the damaged panel, check the underneath for debris or mold. Cleaning this area is vital before installing a new panel. This prevents future issues. Some may find it easier to call in an expert if this process feels overwhelming. Trust your instincts; it’s okay to seek help when needed.
Installing New WPC Panels: Tips for a Secure Fit
When installing new WPC panels, achieving a secure fit is essential. Studies show that improperly installed panels can lead to 30% more maintenance costs over time. Spacing between panels should be uniform. This allows for expansion and contraction due to temperature changes. Aim for a 1/8-inch gap between each panel. This small adjustment makes a significant difference in durability.
Ensure your tools are appropriate for the job. Using a power saw can provide clean edges. Manual cutting may create rough surfaces that compromise fit. Additionally, pay attention to moisture levels. WPC panels perform better in conditions of controlled humidity. A report from the Composite Wood Institute highlights that excess moisture can decrease lifespan by up to 20%.
Check alignment frequently during installation. Crooked panels not only look bad but may indicate structural problems. It’s also wise to revisit your installation process after a few weeks. You might find some adjustments are needed. Keep a close eye on the alignment of panels. Proper alignment protects your outdoor spaces, which is crucial for visual appeal.